Tips and advice for getting the most out of your cordless phones,Mobile Flash File cell phone, GPS system, and any Tricks

Total Pageviews

Wednesday, 12 September 2018

Troubleshoot Windows XP Wireless Network Connection Problems


Does your laptop keep dropping or losing its wireless connection for no reason? Or maybe your laptop can see the wireless access point, but won’t connect unless you restart the entire computer? These are some of the problems that I’ve had myself and so here is a quick and dirty guide to troubleshooting your wireless network in Windows XP without having to go out and buy a new router!

Firstly, the more common wireless issue is when the computer will continuously drop from the WiFi network and then suddenly reconnect for no apparent reason. The main culprit behind this type of problem is usually software, not hardware. By software, I don’t mean your Windows operating system, but the device drivers for your wireless network card and your wireless router.

Troubleshoot Wireless Connection in Windows XP

You’ll need to visit the web site for the hardware manufacturer for your PC and download the latest drivers. So if you have a Dell, go to support.dell.com, find your model and download the driver for the wireless card. Same thing applies to your router, go to D-Link, Netgear, or the Linksys web site and install the latest firmware for the router. You can read a previous article I had written about updating drivers for your wireless card if the connection is dropping.
That will usually fix any problems with the connection being dropped! If you’re having problems connecting in the first place, you might want to try resetting the current configuration in Windows and then try to connect. You can do this by first going to the Control Panel and clicking on Network Connections.
network connections
You’ll get a list of all the current connections on your computer, such as bluetooth, wireless, local area connection, etc. Go ahead and right-click on your wireless network connection and choose Properties.
networkconnectionspropetie
Click on the Wireless Networks tab and click on the name of the network in the list of Preferred networks. Now you want to click Remove so that Windows will erase any of the current settings for that network and will start from scratch. A lot of times when you refresh the list of networks again, Windows will automatically connect. Go ahead and click OK and then click on the wireless network icon in your taskbar and try to connect again.
wireless network
If that does not work, you can also try to Repair the wireless connection. The Repair option tries a few other things, such as disabling and re-enabling the wireless card, clearing out the DNS cache of old records, and then connecting to the wireless network. You can do a repair by going to Network Connections as shown below and right-clicking the wireless connection and choosing Repair. My image is showing Local Area Connection, but you should see Wireless Network Connection if your computer has a wireless card. 
repair network connection
Finally, it’s a good idea to check the TCP/IP properties of your network connection to make sure they are configured properly. A lot of times people manually change them or are told to change them by computer help desk folks on customer support calls. To check the settings, go to Network Connections like mentioned above and then right-click on the network connection and choose Properties.
network connection properties
Now select Internet Protocol (TCP/IP) in the list box and click on Properties. You’ll want to make sure that the Obtain an IP address automatically and Obtain DNS server address automatically radio buttons are selected. There are cases where the IP address and DNS server addresses have to be manually entered, but that is rare and should never be the case in the home environment.
obtain ip address automatically
So if updating the driver, resetting the configuration, and repairing the network connection don’t work, then try to unplug the wireless router and plug it back in after about a minute. It’s best to turn off the cable modem too, but you should always turn on the modem first, then the router.
Unless there is something physically wrong with the router, one of the methods above should work! If you’re still have trouble with a network connection in Windows XP, post a comment and we’ll try to help. Enjoy!

Automatically Move Emails into Folders in Outlook using Rules


In this post, we’ll take a look at how you can manage your Outlook email better by having incoming mail automatically moved into separate folders. If you get a lot of email everyday, this can save lots of time. Rather than having to spend an hour once a week moving emails from the Inbox to your categorized folders, email rules will help automate your inbox organization. This is very similar to using labels and filters in Gmail.

Email rules may seem complicated and they can be if you really want to perform some sophisticated sorting, but if you simply want to move work emails to the Work folder automatically, then it’s a piece of cake.
In order for rules to be useful, you should first create some folders underneath your Inbox to categorize your email, such as Projects, Work, Family, etc. You can create folders by right-clicking on Inbox or any folder and selecting New Folder. The following procedure works on Outlook 2010, 2013, and 2016.

Setup Outlook Rules

Now to get started, open Outlook, click on the File tab and you’ll see the Manage Rules & Alerts button towards the bottom.
The Rules and Alerts main window will appear and by default you might see one rule already created depending on your version of Outlook.
From here you will click the New Rule button to get started with your first Outlook email rule. The Rules Wizard dialog will pop up and it will show you some common rule templates. These are the most common ones and probably all you’ll ever need. The most common rule is the first one listed, “Move messages from someone to a folder“. Go ahead and select it, then click Next.
You’ll notice the bottom list box that is called “Step 2:” remains at the bottom with some underlined text. In reality, all of you have to do to setup the rule is click on the hyperlinks for people or public group and specified to choose the email address and where you want those email to go. Then you can click Finish and you’re done. However, if you want to make the rule more complicated, then clicking Next will give you a whole lot more options:
rules wizard
As you check on different conditions in the top list box, the rule description at the bottom will also populate with more hyperlinks. You can even create rules that look for specific words in the email body and then perform actions on those emails. Your next task is to click on each hyperlink and choose the associated values like email addresses, folders, etc. In our example above, you’ll want to click on people or public group and choose an email address.
rules address
Then click on the word specified and browse to the folder you would like the email to be moved to or click New and a new folder will be created under the currently highlighted folder.
rules and alerts folder
Now you’ll see the bottom part updated with the actual values for your rule.
outlook email values
When you click Next, you can set more actions for the rule. You can normally leave this alone if it’s a simple rule, but if you want to also perform other actions like play a sound, forward the email, make a copy of it, print the email, start another program, run a script, etc, then you can do all of that on this screen.
perform actions outlook
Click Next when you are done and you’ll be brought to the Exceptions dialog, where you can choose what conditions you would not want to have this rule processed. Unless you have some unique cases, you can leave it blank, which is the default.
outlook rules exceptions
Click Next and we’ve finally reached the end of the rule wizard! Give the rule a name like “Move Friends Email” so that you know what it does when you look at it later on. Then if you have emails already in your Inbox that would match your new rule, check the box to “Run this rule on messages already in Inbox“. You can leave everything else as default and click Finish!
finish outlook rule
Now you can create rules for people, newsletters, bank/credit card statements and whatever else you can think of to start managing your Outlook email more efficiently!

Tuesday, 11 September 2018

7 OS X Tips for Windows Users


If you recently purchased a Mac or if you have been required to use a Mac for work, you might be frustrated trying to use OS X if you have been a long-time Windows user. This is completely understandable and Apple really doesn’t care to change their OS to match that of Windows anytime soon.

Apple loves OS X the way it is and it will probably remain the way it is for the remainder of its life. This means you’ll need to get used to some of the differences between Windows and Mac. In my view, OS X could still be made to be easier to use by default, but unfortunately, you have to manually make some changes to make things better.
In this article, I’m going to give you a couple of my favorite tips for Windows users who have to use a Mac and OS X. Once you get used to OS X, you may even like it more than Windows, which is what happened to me. There is a small learning curve, but it’s worth the effort. Also, be sure to check out my post on programs and features in OS X that are equivalent to Windows.

Tip #1 – How to Right Click

One of the most annoying things as a beginner Mac user is trying to figure out how to right click! There is no separate right-click button for Macs and this can be really annoying for some people. Luckily, the Apple method is actually kind of more intuitive and easier to use.
All you have to do to right-click is to use two fingers when you perform a normal click. When you click with two fingers, you get the right-click context menu. For me, this is way more convenient than having to move my finger all the way down to the correct button like on most Windows laptops.
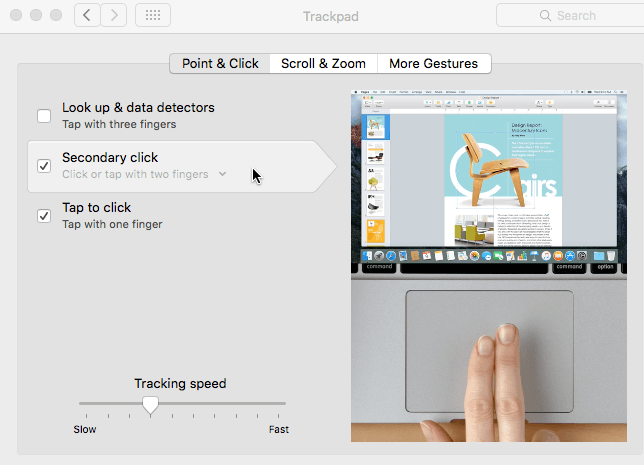
You can change the settings for how right-click works by going to System Preferences – Trackpad and clicking on the Point & Click tab.
By default, the right-click option is called Secondary click in OS X. If checked, it is normally set to Click or tap with two fingers, but you can click on the small little arrow and choose from two other options also: Click in bottom right corner or Click in bottom left corner. If you just love the way you did it in Windows, you can tweak OS X to get the same behavior.
Also, another quick tip is to check the Tap to click option also. Most Windows laptops allow you to tap to click, but OS X does not have this enabled by default so you have to manually press down the button to click. If you go to Scroll & Zoom, you can also change the scroll direction to whichever is more natural for you.

Tip #2 – Add Applications to the Dock

The other major change that is most jarring for Windows users is the lack of a Start button. There simply isn’t any central button in OS X. You have the small Apple logo icon at the top left, which can do a few things like get you to System Preferences or let you restart/shutdown your computer.
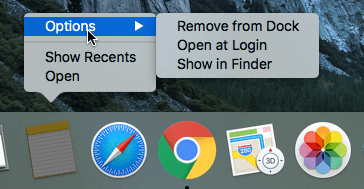
The Dock is basically like the Windows taskbar, but only with shortcuts and nothing else. The other annoying thing is that it starts out completely full of default Apple apps. I almost never use more than one or two, so the first thing I do is get rid of them. You can do this by right-clicking on the icon in the dock, choosing Options and choosing Remove from Dock.
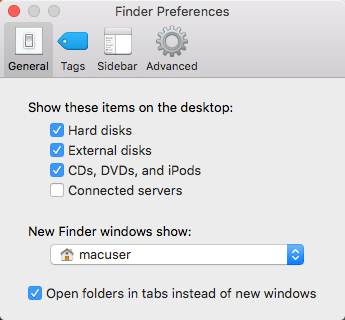
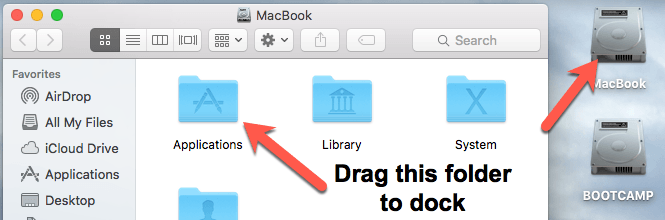
Once you have done that, you can add a kind of All Programs folder to your Dock that will let you see a list of all programs installed in OS X. To do this, you have to drag the Applicationsfolder to your dock. In order to do that, you need to click on the icon of your hard drive that should be on the Desktop. If you don’t see it, click on Finder at the top left of your Mac and then click on Preferences. On the General tab, make sure to check the boxes for Hard disksExternal disks and CDs, DVDs and iPods.
Click on the hard disk icon on your desktop and you should see the Applications folder listed along with other folders like Library, System, Users.
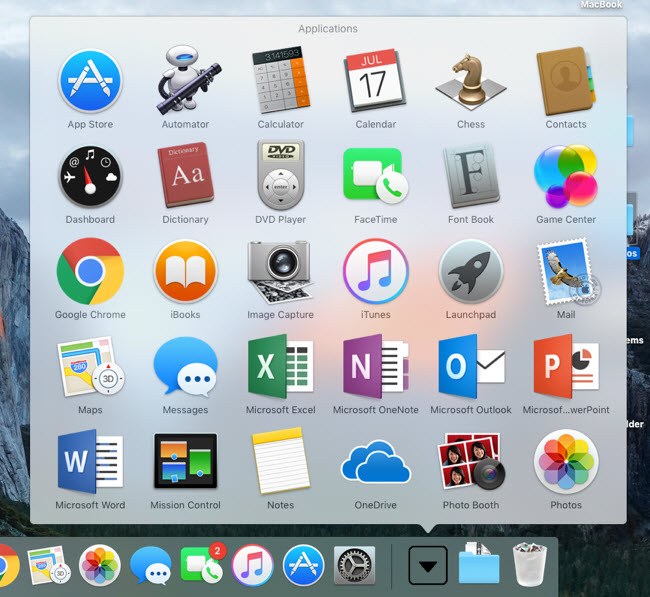
Go ahead and drag that folder down to your Dock. Now when click on the icon, you’ll get a full listing of all the programs installed on your Mac. It’s better than trying to add them all to your Dock or having to use Spotlight to find the program you want to run.
You can also use Launcher (the silver/grey rocket icon in the Dock), but I never find myself using that for some reason.

Tip #3 – Eject Drives using the Trash

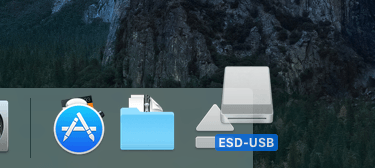
This one has to be the best. For the longest time, Apple has confused people when it comes to ejecting devices from the system. In order to eject a flash drive or DVD, you either have to right-click and choose Eject or you have to drag the item into the Trash.
This would be like dragging your USB drive into the Recycle Bin in Windows, which basically means delete everything! So obviously, people don’t even like the idea of throwing anything that has important data on it into a trash can!
However, that’s how you have to do it in OS X and no, it won’t result in any lost data. You’ll notice, actually, that when you click and drag an external drive or disc in OS X, the icon for the trash can changes to an eject icon. I guess this is supposed to make us feel better somehow.

Tip #4 – Tweak Finder

Finder is basically like Windows Explorer. A much simpler version of Explorer in my view. However, I prefer the more detailed and cluttered view of Explorer than the streamlined Finder. It’s just too simple.
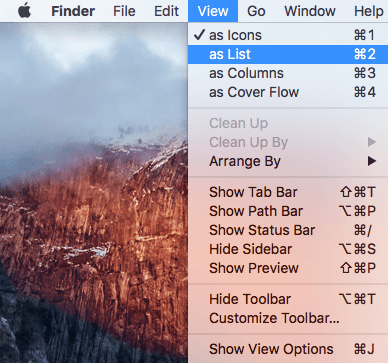
So to add more stuff into Finder, open a Finder window and then click on View and click on the Show Path Bar and Show Status Bar options. This will give Finder a more Explorer-like look.
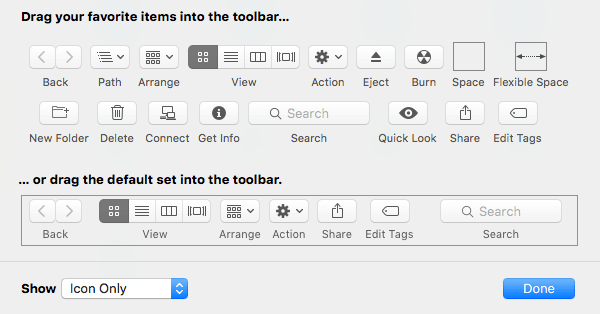
While under View, click on Customize Toolbar to add a couple of useful icons to the default toolbar. Personally, I like to add the New FolderDelete and Get Info buttons to my toolbar.
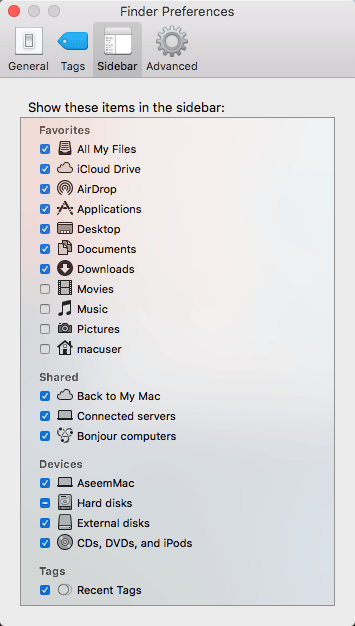
Lastly, click on Finder, then Preferences and then click on Sidebar. Here you can add other items to the Finder sidebar like Pictures, Music, etc. This is similar to the library folders in Windows.
On the General tab, you can also edit the New Finder window shows option and pick something other than All Files. I prefer to pick my home folder, which matches more to Windows explorer.

Tip #5 – Learn to Use Spotlight

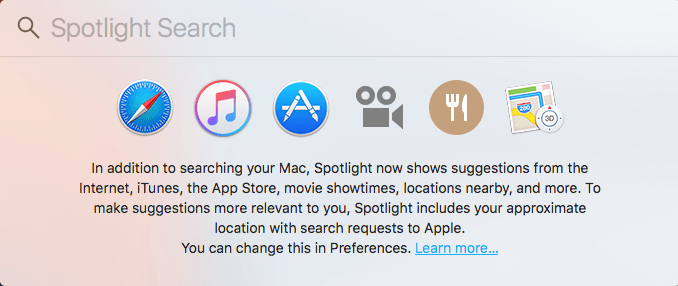
If you’re used to the search box in the Start menu on Windows, you’ll be happy to know there is an equivalent search option in OS X called Spotlight. You can get to it in two ways: either by clicking on the magnifying glass at the top right of your screen or by pressing theCommand + Spacebar keyboard shortcut.
Using Spotlight is the best way to find your files, change settings in OS X, find apps to install, find emails, find calendar events, etc. It also shows results from the web, so you could search for Apple and get suggested websites and even a map to the local Apple store.

Tip #6 – OS X Uses Spaces & Full Screen

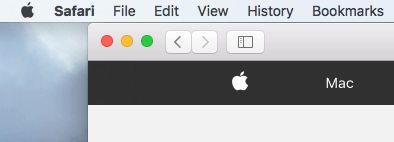
 Another thing you have to get used to is understanding how those three buttons at the top left of every window work. In Windows, you have three buttons: a minimize button, an expand button and a close button. In OS X, you have a red close button, a yellow minimize button and a green button that expands, but differently depending on the program.
If you click on the green button for Safari, for example, it will expand to full-screen and everything else will disappear. If you move your mouse to the top of the screen, you’ll get see the toolbar, but that’s about it. So where did all your other windows go and how do you get to them?
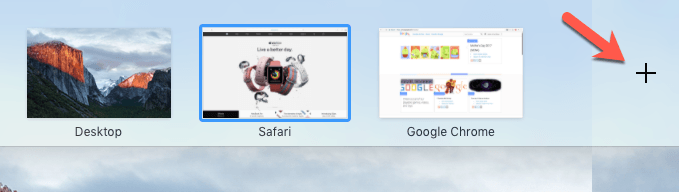
Well, in OS X, the app has basically gone into its own space. If you scroll up with three fingers, you’ll see something called Mission Control. Basically, it shows you a thumbnail of each desktop or program that is using its own space.
They are basically virtual desktops in OS X. Most built-in apps will use up their own space when expanded using the green button. You can either click on a space to activate it or you can use the three finger swipe to the right or left to browse through the spaces. I do like this feature a lot because it lets you work in one app fully, but still allows you to get around to other apps quickly.
On some apps, however, the app will expand to full screen, but it will not go into its own space. It’ll basically remain on the original desktop, just taking up most of the screen. Most third-party apps like Microsoft Office now support the full-screen mode that go into their own space.
You can also click on the little plus icon to add a new desktop if you like. You can have specific programs open in specific desktops if you like and you can even change the background so that each desktop has a different one. It takes a bit of practice, but once you get used to it, you’ll be using it all the time. Just remember the three finger swipes.

Tip #7 – Install Programs from the Mac App Store

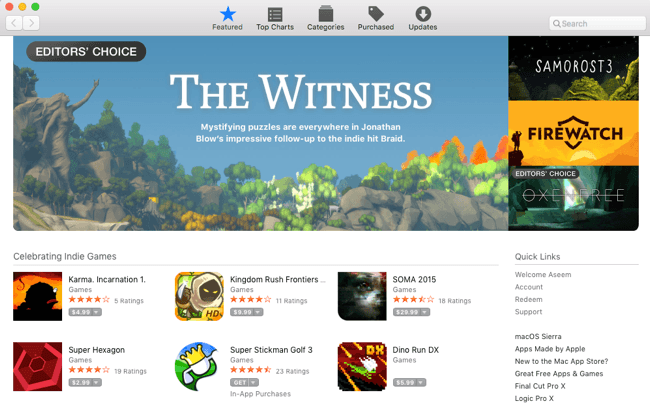
By default, Apple tries to protect you by only allowing you to install apps from the Mac App store and from identified developers. In one sense, it’s good because it keeps you a bit safer without having to do much on your part.
If you want to install a new program, the best place to go is the Mac App store. Whereas Windows software is usually downloaded from everywhere on the Internet, most programs you’ll ever need to install on your Mac will be available in the Mac App store. If you really need to install something from some other place, you can go to System Preferences – Security & Privacy and select Anywhere under Allow apps downloaded from.
So hopefully those are some good tips for beginner Mac users who pretty much used Windows for their entire lives. There are a lot of other differences, but if you can get through these major ones, you’ll enjoy using your Mac rather than wanting to beat it. Enjoy!

The Best Free Apps for a New iPhone


When I first got up new iPhone 5S (thanks to my parents), I instantly went to the app store and starting downloading apps! Having a smartphone and not using apps is like having a computer and only using it to browse the Internet. If you have an iPhone, you’re also lucky because the Apple app store is still better than the Android app store in terms of number of apps and quality of apps, in my opinion.

So what are the best free apps to download for your new iPhone right away? Well, there are a bunch! Obviously, everyone will have their preferences, so I’ll try to keep this list fairly general and useful for anyone. In addition, I won’t list many alternatives, just one or two at the most and normally the best ones.
I’ll also break it down by category, so if you’re looking for the best video app or chat app, you can skip down to the appropriate section. I’m not going to mention any games because the “best” game changes everyday and there are already enough lists online for finding good games. I’ll also not mention news apps and a couple of other categories that are pretty self-explanatory.

Best Maps/Navigation Apps

iphone maps
Google Maps – I pretty much use the GPS on my iPhone all the time when driving and it’s completely replaced the Garmin GPS I had used for years before. Apple Maps is pretty good now, but it’s still lags far behind Google Maps. Since it’s a Google product, you can log in using your Google account also and have all your data synced, which makes life a lot easier.
Waze – Waze is turn-by-turn navigation with the addition of a social community that helps brings in useful information for drivers. It has been acquired by Google, but it still a separate app. Eventually, it might be merged into Google Maps, which would make that app the only one you really need for GPS navigation!

Best Weather Apps

yahoo weather
There are a million weather apps and it really comes down to preferences, so you may hate my list! If you really love something else, post in the comments.
Yahoo Weather – This is my favorite because it’s got a beautiful interface and pretty much all the information you need, unless you’re hardcore about weather, in which case you’ll probably be spending money on a fancy weather app. But for free, this is just perfect.
Weather Underground – A lot of people swear by this app and I’ve used it also and really liked it. It’s free, but it includes ads. That’s the only downside. You can pay 99 cents and get the ads removed, but we’re trying to only mention the best free apps. Regardless of the ads, it’s still an excellent weather app.

Best Camera/Photo Apps

apple camera apps
flickr – The flickr app lets you browse your Flickr photos and also lets you upload everything from your iPhone up to their free 1 TB storage account. If you take a lot of photos, this is a great option. It’s also got filters and editing tools, so you can fix up your photos before uploading to flickr, Twitter or Facebook.
Google+ – Google+ is mostly a social networking app, but I listed it under best camera/photo apps also because it is actually really great for photos. If you used Picasa Web Albums in the past, those have been converted into Google+ photo albums and you can access them all from the Google+ app. It also auto uploads all your photos and videos to Google+ and create animated GIFs, enhances photos and more for you automatically.
Instagram – It’s hard not to find a friend who isn’t using Instagram. Even though Facebook bought them, they are still one of the most popular photo sharing apps out there.
Snapseed – The above-mentioned apps are mostly related to photo viewing and storage, but Snapseed is good for photo effects. You can transform and adjust photos with the many options and tools this app includes all for free.
Photo Editor by Aviary – Another free app, but this one has in-app purchases if you want more effects than just the basic ones. The free version has a lot of features and more than enough to create some pretty cool edited photos.
VSCO Cam – Again, like the photo app by Aviary, you get a basic set of filters and can purchase more via in-app purchases. The program uses some advanced technology to add stunning effects to your photos.

Best Cloud Storage Apps

dropbox
Dropbox – The most popular and widely known, Dropbox is pretty sweet for storing your files in the cloud. It works on pretty much every device and on the iPhone it’s amazing for uploading all your photos and videos automatically. Only downside? Expensive for storage. If you use a lot of data, you’ll be paying way more than the competitors.
Google Drive – My new favorite because of the huge price drop: $10 a month for 1 TB of storage. You only get 500 GB on Dropbox for $500 a year. My new plan is to move most data from Dropbox to Google Drive and then continue to use Dropbox, but only on the smaller less expensive plans. Google Drive can’t aut0-upload anything from your phone. Google+ can, but the two don’t currently integrate very well, something Google needs to do if they want to compete more with Dropbox.
OneDrive – Even though it’s from Microsoft, it’s a pretty good app. Just about everyone has a Windows PC, which makes this app actually useful. OneDrive is integrated into Office 2013, Windows 8, Windows Phone, Microsoft Surface and other Microsoft products, so if you are in the Microsoft world, this is a good cloud storage app. It’s also cheaper than Dropbox in terms of storage.

Best Messaging/Chat Apps

google hangouts
Google Hangouts – Hangouts is great for anyone who uses Gmail and other Google services. It lets you chat with your buddies and do video calls with groups of people. Not a very great chatting app if you really think about it, but since it’s Google, it’s useful.
WhatsApp – If Facebook paid $16 billion for it, you should probably use it. Just kidding, but very useful for anyone who has family outside of the US because the rest of the uses WhatsApp for messaging.
Facebook Messenger – You can use stickers, make free calls, record voice messages and send free text messages. Messenger is a pretty useful app for keeping in touch with people. Also, it’s Facebook, so everyone you know in the world will be on it.
Snapchat – If you’re a teenager, then go ahead and download as you’ll probably want to share inappropriate pictures of yourself with other inappropriate teenagers. Good luck.

Best Social Apps

facebook paper
Facebook Paper – Paper is Facebook’s new app that lets you follow your News Feed in a much more modern looking UI. Everything looks better in the Paper app and it lets you follow popular news stories on a variety of topics.
Twitter – If you’re not on Twitter yet, you really should jump on the bandwagon. Even if you never post anything, you can get a lot of useful info by following the right people or companies on Twitter. Actually, I get better customer service from companies by posting on Twitter than by calling or emailing nowadays.
LinkedIn – Even if you work for yourself, you should have a profile on LinkedIn. It’s the best social networking site for professionals. Companies use LinkedIn like crazy for finding good talent, so keep tabs on your connections via the app.
Pinterest – I’m not a huge user of Pinterest, but that makes me an exception. Pinterest has huge traffic numbers and people seem to love it. Find interesting stuff whatever your interests might be.
Google+ – Google+ isn’t going to ever replace Facebook, but it’s a good complement. The posts on Google+ are more polished and newsy rather than photos of someone’s lunch or babies.

Best Online Video Apps

youtube
YouTube – It only has the most videos in one place in the entire world. Definitely have to download the YouTube app and catch up on whatever crazy viral video is floating around the web that day.
Netflix – If you have a Netflix subscription, then you’ll want the iPhone app so you can binge-watch Breaking Bad or House of Cards.
Amazon Instant Video – If you have an Amazon Prime membership, then you’ll want the Instant Video app to watch all that free content Amazon offers.
Vine – You can literally spend hours watching ridiculously short, yet hysterical videos on Vine. You can also create your own and post it!

Best Note Taking Apps

evernote
Evernote – This is the king of note-taking apps and has a slew of features. You pretty much can’t go wrong with Evernote. It works on all devices and there are plugins for browsers, applications, etc.
Microsoft OneNote – OneNote is Microsoft’s free note-taking app that I really like. It’s free on Mac and PC also, so your notes will be synced across computers, the web and your mobile device.

Best Local Apps

yelp iphone
Yelp – You’ll always need good recommendations for places to eat, etc, so downloading one of the most popular local guide apps is smart. Yelp is integrated in Google search, Bing and lots of people leave reviews, which makes using it useful.
AroundMe – Another great app for quickly finding local businesses around you. While Yelp is more focused on food, AroundMe can help you find ATMs, hospitals, banks, bars and lots more.

Best Movie Apps

imdb
IMDB – Absolutely the best app for getting information about an actor, movie, TV show or anything related to movies and television. A must if you watch any TV or movies at all.
Fandango – Awesome app for getting local showtimes and watching movie trailers. Pretty much the same as Flixter, but I like this app better.

Other Best Apps

In addition to the above apps, there are some that don’t necessarily fit into one of the categories above. Here’s a couple of more that I find useful.
Chrome Browser – If you’re already a Google user, Chrome has some nice features to keep everything in sync. I also find it faster and better than Safari.
Google Search – Even if you never use this app to actually perform a search, you should use it for the Google Now notifications. If you’re a Gmail user, you can connect the two and get alerts automatically for flights, packages and more.
Skype – Facetime is awesome, but sometimes you need to video chat with someone who doesn’t have an Apple device. Skype is a great option since it’s already so popular.
Find My iPhone – You should definitely have this installed if you have more than one Apple device using the same iCloud account. It helps me keep track of all of my family members at any time.
Mint – You probably have credit cards, right? Bank accounts? Loans? Investments? Mortgage? Keep track of it all using the free Mint app.
Runkeeper – Runkeeper is the only fitness app I’m mentioning because it’s free and it does an amazing job of keeping track of your runs.
Obviously, this is a short list of best apps, but I wanted to keep the list small and to the point. I don’t like giving people 10 choices for every single category because then it’s hard to decide which one to download. What are some of your favorite free apps that you use daily or regularly? Let us know in the comments. Enjoy!