Tips and advice for getting the most out of your cordless phones,Mobile Flash File cell phone, GPS system, and any Tricks

Total Pageviews

Showing posts with label ANDROID & PC tips. Show all posts

Sunday, 7 October 2018

OTT Guide to Backups, System Images and Recovery in Windows 10


Just about all new versions of Windows have many components that are taken from previous versions of the OS. Most of the time, it’s a better version of the old software. Sometimes, like in Windows 8, multiple versions of the same feature are included and it can make things worse.

Lastly, some features from older versions of Windows are good enough to keep as-is in newer version. One example of this is the backup options. In this article, I’m going to talk about the built-in backup features in Windows 10 and how it’s a blend of new Windows 10 features and old Windows 7 backup options.
In a way, it’s a good thing that you still have all the options you had before, but it’s also more confusing, just like having IE 11 and Edge installed at the same time.

Windows 7 Backup Options in Windows 10

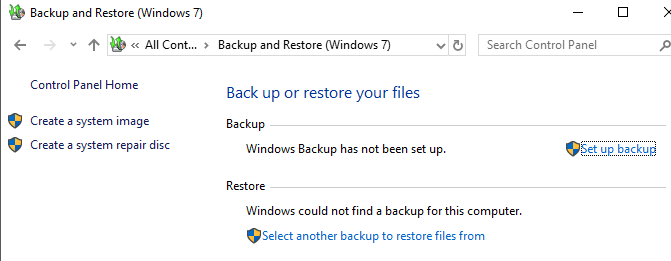
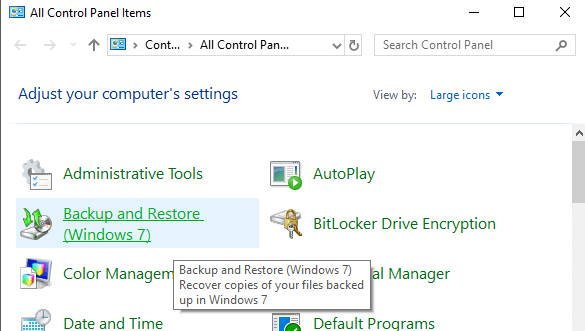
In Windows 10, you can still do everything you were able to do in Windows 7 in terms of backups and recovery. If you go to the Control Panel, you’ll see an option called Backup and Restore (Windows 7).
The dialog that pops up is pretty much the same one you see in Windows 7. You can Create a system imageCreate a system repair disc, Set up backup or restore a backup if there is one available.
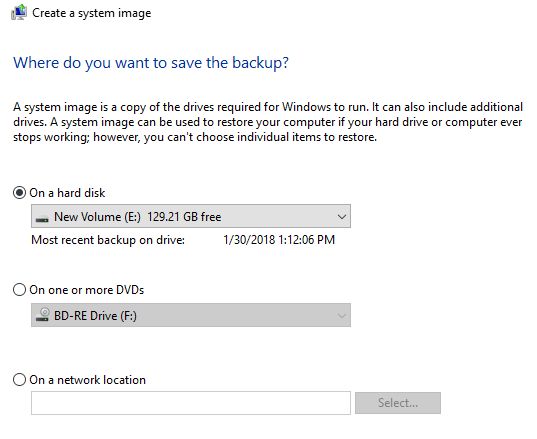
If you click on Create a system image, you’ll have a  choice of where you want to save the image. Only on Windows 10 Pro and Windows 10 Enterprise can you save the system image to a network location.
Note that you cannot save the system image to any drive that is included in the system image. Creating a system image this way is a manual process. If you want to have it done automatically, you need to choose the Set up backup option.
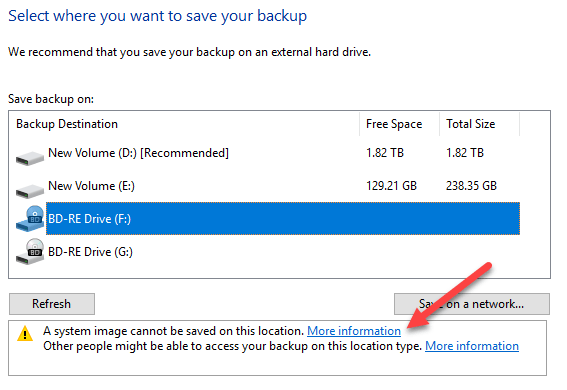
This is the same as Backup and Restore in Windows 7. Basically, you choose where you want to save the backup to and then pick a schedule. The only thing you have to note is that you cannot create a system image if you backup to DVD. You have to backup to a hard disk or network location in order to have that option otherwise it’s greyed out.
By default, the system images are saved in the following format, where X is the drive you choose.
X:\WindowsImageBackup\PC_Name\Backup YYYY-MM-DD HHMMSS
For example, if I chose to save the system image to an external hard drive (E:), then I the location of the backup would be:
E:\WindowsImageBackup\AseemPC\Backup 2018-10-04 083421

Backup Restore Options in Windows 10

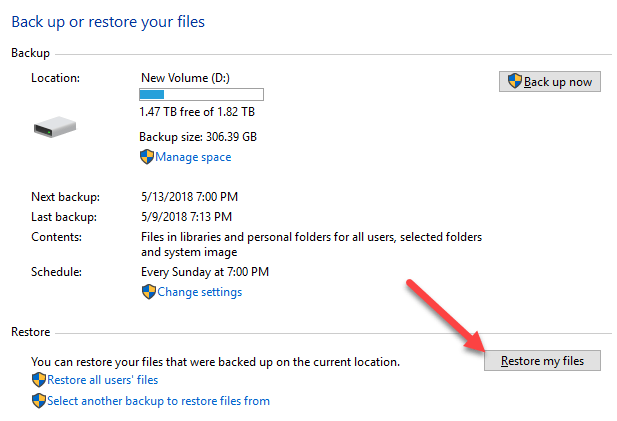
There are two ways to recover data from your backups in Windows 10. If you created a system image, then you have to boot to System Recovery Options in Windows 10 to restore the image. If you backed up using the schedule feature and picked files and folders, you can restore the files/folders from within the Backup and Restore (Windows 7) dialog.
Click on the Restore my files button and then you can go ahead and selectively choose which files you want to restore from the backup.
For restoring the system image, it’s a different procedure. Note that restoring a system image is a full restore, meaning that you can’t pick and choose what you want to restore; everything will be wiped out and replaced with the image. Restoring from a normal Windows backup allows you to restore individual files and folders.
To restore a system image, you need to boot to System Recovery Options in Windows 10. Once there, you need to click on Troubleshoot.
troubleshoot
Then click on Advanced Options.
advanced options
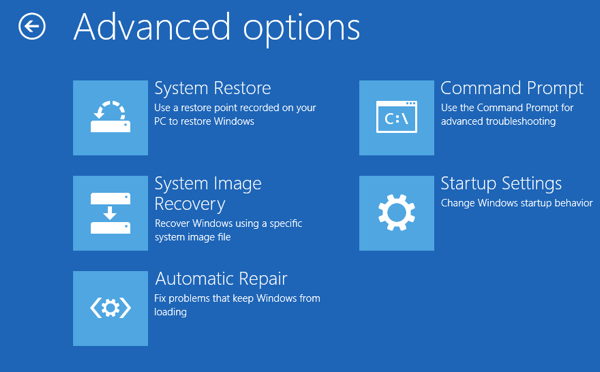
Then go ahead and click on System Image Recovery.
system image recovery
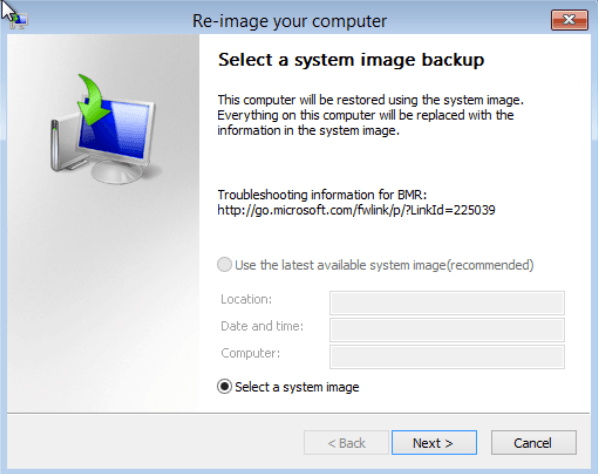
Next, you’ll have to choose an account and type in the password for that user account. You’ll then have the option to restore from the latest system image or choose a specific image, which you would do if you had the system image saved to an external USB hard drive, a network location or a DVD, for example.
system iamge backup
Once you have selected the image, you’ll have several options on how to restore the image to your computer. Note that you can only restore to a disk that is the same size or larger than the disks included in the backup image.

Reset this PC in Windows 10

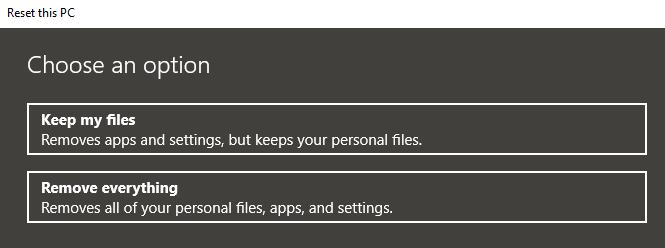
In addition to the options above, you can also use a new feature in Windows 10 called Reset this PC. This is basically like performing a repair install in Windows XP or Windows 7. All system files are replaced and you essentially lose all your programs and settings, but you data stays intact.
This is exactly what Reset this PC does, but it’s a lot easier and really just takes a couple of clicks. It also gives you the option to completely erase everything and start from scratch. This is click performing a full clean install of Windows 10.

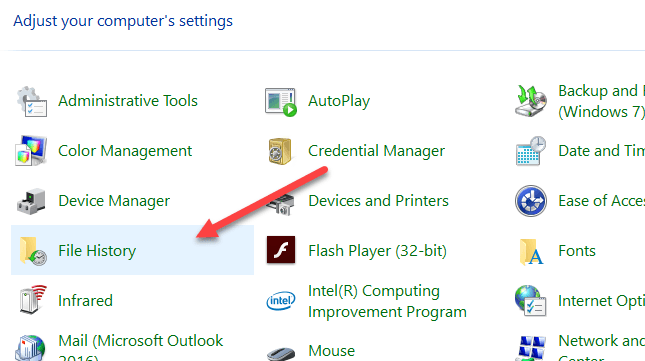
File History

In addition to all the Windows 7 backup and restore options, the Reset this PC option, you also have another new feature in Windows 10 called File History.
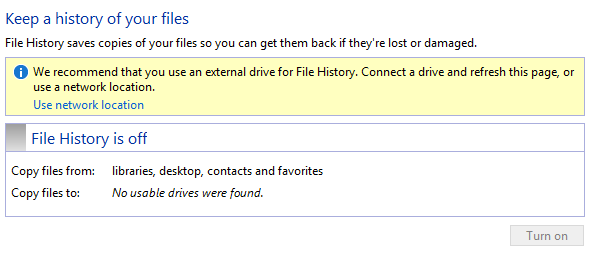
File History is turned off by default. Also note that if you are using a Windows 7 file backup with a schedule, File History cannot be enabled! You’ll see this message:
You have to turn off the schedule in order to use File History. This is kind of annoying since that means you’ll have to manually create system images if you like to have system images for your backups. Once you disable scheduled Windows 7 backups, you’ll see you now can turn File History on.
enable file history
It’s suggested that you use an external drive or secondary hard drive for saving the file history instead of a local hard drive or partition. You can also use a network location if you like. Actually, you can’t even choose a location on the same physical disk for File History. This is one advantage File History has over Shadow Copies, which was a similar technology in older version of Windows. If the drive dies, you can reinstall Windows 10, give it the same name as the dead system and then choose the same location for File History as the dead machine.
Once you have chosen a location, the Turn on button will be enabled so you can click on it. That’s about it, FIle History is now on! So what does that mean and what does it do?
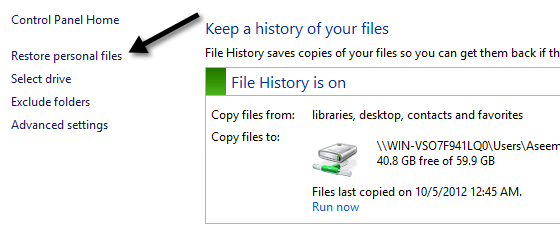
Well, it basically saves versions of the files stored in your libraries, favorites, contacts, and a few other locations like Music, Videos, Pictures and Desktop. If you go back to File History after it’s made some copies, you can click on the Restore personal files option.
restore personal files
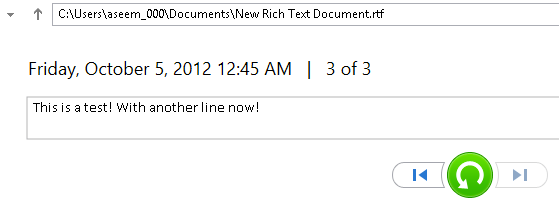
You can now browse through to a specific file or folder and navigate back and forth in time using the green blue keys at the bottom of the screen. Here’s an example of a text document I created and edited with some text.
windows 8 file history.png
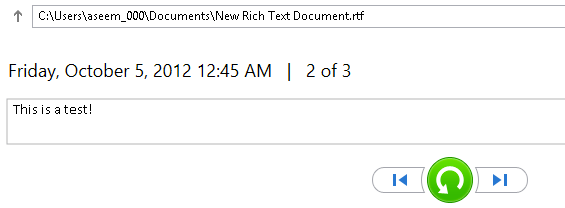
If I click the left arrow key, I’ll see version 2 of 3, which has a little bit less text than version 3 of 3.
recover files windows 8
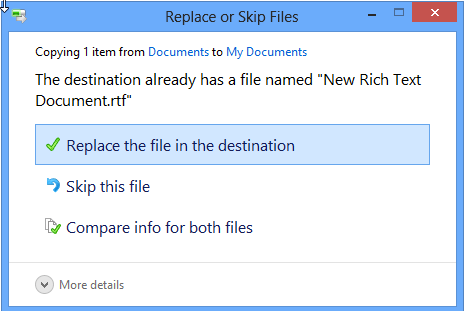
Pressing the green circular arrow button will allow you to restore that version of the file:
restore file
You can replace the file, skip it or see some comparison info on the files. Unfortunately, it won’t actually compare the content of the files, just the date and other info like the size, etc. File History sounds pretty good, but it has some serious issues in my opinion and with a lot of other people too, apparently.
1. If you rename a file, the history for that file is lost. It basically starts from scratch again. So renaming a file is pretty much the same thing as deleting a file and starting over. The old history still exists, just with the old name.
2. Following from point one, if you create another file with the name of the original file, the histories will be joined! So if you delete a file that had a history and then you create a new file with that same name, you’ll get the history of the previously deleted file too.
3. Copies are made of the entire file each time a backup is done. So if you have a 500 MB file that gets changed three times in a minor way, you’ll have three 500MB copies of that file.
4. You can’t backup anything other than files and folders. You’ll still have to rely on Backup and Restore (Windows 7) for actually backing up your Windows 10 system.
5. You can’t include additional folders other than the ones pre-defined by Microsoft. This means if you want to use File History, you’ll have to move the data to one of the designated folders.
Overall, it’s all complicated system of backup options in Windows 10 that will most likely confuse new users. Hopefully, this article sheds some light on the different options, their advantages and disadvantages and how you can use them in combination to create a robust backup plan for your Windows 10 PC.
Lastly, you can skip out on all the built-in options if they aren’t good enough and simply use a third-party tool for cloning and imaging your system. If you have any questions, feel free to post a comment. Enjoy!
Wednesday, 12 September 2018

How to Block Internet Web Sites with Free Parental Control Software


Are you on the lookout for free web filtering and parental control software that you can use on a home or school computer to block access to porn, gambling, social networking or spyware web sites? For most parents, controlling the time children spend on the Internet and the content they view are a real necessity to ensure a safe and clean browsing experience. In this article, I’ll talk about two popular parental control programs.

The first one is Bluecoat’s K9 Web Protection, a very easy to use Internet and Content filtering solution for home use. The technology is based off their enterprise filtering technology used by Fortune 500 companies across the world. K9 basically divides web sites on the Internet into 55 categories based on the content of the site. You can configure which categories you want to allow and which you want to block.
K9 is also always up-to-date because it accesses Blue Coat’s large online database of over 8 million web sites with ratings. This service-based type of filtering means that K9 receives over 50 million requests per day, making it very accurate and very quick to pick up any new inappropriate sites. With the proliferation of porn and spyware sites, it’s essential to use a service that has a constantly updating database.
If K9 comes across a web site that it does not have in its database, it uses its patent-pending dynamic real-time rating technology (DRTR) to determine the category and rating of the web site using statistical analysis and artificial intelligence algorithms. According to the site, the technology is really good at blocking porn and adult-related web sites.
Finally, since this was taken from a enterprise product, K9 uses high-performance caching technology to ensure that web pages load as quickly as possible while keeping you safe at the same time.
To get started with K9, click on Get K9 Now at the top menu and fill out the information in order to receive a license key. The license key is free. Next, click on Download software on the left menu and install the software. You’ll be asked for the license key during the install. You’ll also be prompted to enter a password for the admin panel and to uninstall the program, so don’t lose the password!
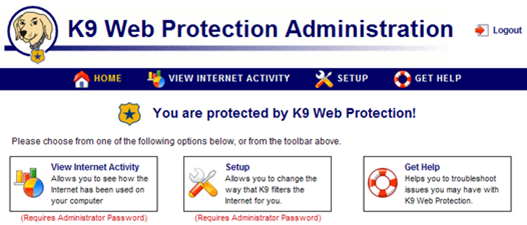
Restart your computer and open K9. From the main page, you can View Internet Activity, change the Setup for blocked categories, or get help.
Click on Setup to choose the level of security appropriate for you. By default, there are about 20 categories blocked including social networking sites like FaceBook, MySpace, etc. If you click on show details, you’ll also get the recommendation for the which setting is appropriate for children of a certain age. For example, High is recommended for kids under 10.
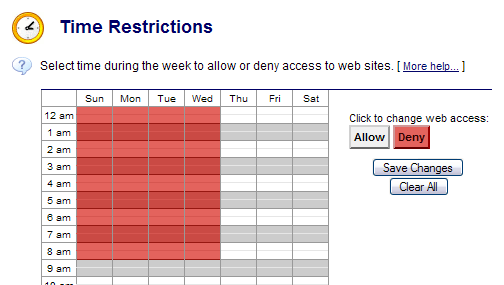
Under setup on the left menu, you can also setup other restrictions such as Time restrictions, specific web site restrictions, blocking effects, keyword blocking, and emailing preferences.
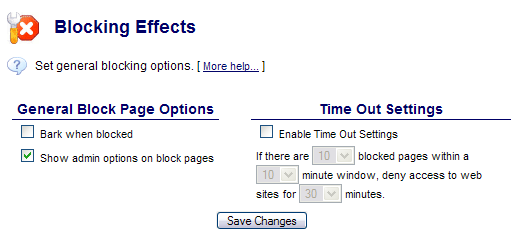
Blocking effects is an interesting setting in that you can choose to “bark” when a site is blocked, show the admin panel to override a blocked page (useful for yourself), or block all sites if too many sites were blocked in a specific amount of time!
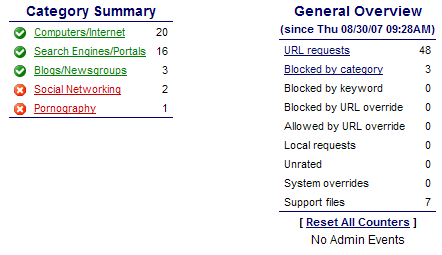
Finally, click on View Internet Activity to get a detailed report of all web sites browsed and which categories they belonged to.
You can easily see which web sites were blocked and at what time by clicking on the red categories. You can do the same for the green categories.
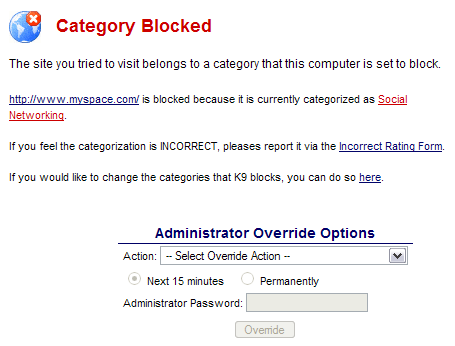
When a site is blocked, you’ll get a short reason why and if you set the option to override, you can enter your password and choose to unblock it permanently or for a certain period of time!
Overall, K9 is a really nice web-based filtering solution that can keep your family computer safe from harmful viruses or spyware and keep kids from accidentally ending up on a really nasty site!
Enjoy!

Troubleshoot Windows XP Wireless Network Connection Problems


Does your laptop keep dropping or losing its wireless connection for no reason? Or maybe your laptop can see the wireless access point, but won’t connect unless you restart the entire computer? These are some of the problems that I’ve had myself and so here is a quick and dirty guide to troubleshooting your wireless network in Windows XP without having to go out and buy a new router!

Firstly, the more common wireless issue is when the computer will continuously drop from the WiFi network and then suddenly reconnect for no apparent reason. The main culprit behind this type of problem is usually software, not hardware. By software, I don’t mean your Windows operating system, but the device drivers for your wireless network card and your wireless router.

Troubleshoot Wireless Connection in Windows XP

You’ll need to visit the web site for the hardware manufacturer for your PC and download the latest drivers. So if you have a Dell, go to support.dell.com, find your model and download the driver for the wireless card. Same thing applies to your router, go to D-Link, Netgear, or the Linksys web site and install the latest firmware for the router. You can read a previous article I had written about updating drivers for your wireless card if the connection is dropping.
That will usually fix any problems with the connection being dropped! If you’re having problems connecting in the first place, you might want to try resetting the current configuration in Windows and then try to connect. You can do this by first going to the Control Panel and clicking on Network Connections.
network connections
You’ll get a list of all the current connections on your computer, such as bluetooth, wireless, local area connection, etc. Go ahead and right-click on your wireless network connection and choose Properties.
networkconnectionspropetie
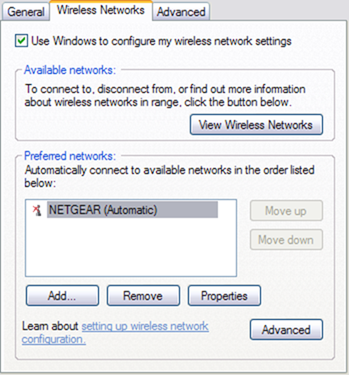
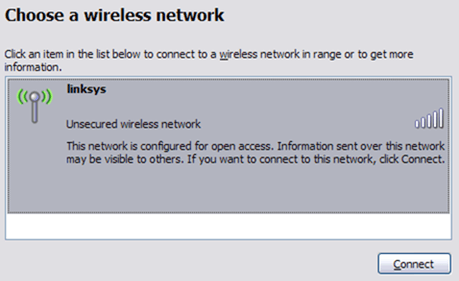
Click on the Wireless Networks tab and click on the name of the network in the list of Preferred networks. Now you want to click Remove so that Windows will erase any of the current settings for that network and will start from scratch. A lot of times when you refresh the list of networks again, Windows will automatically connect. Go ahead and click OK and then click on the wireless network icon in your taskbar and try to connect again.
wireless network
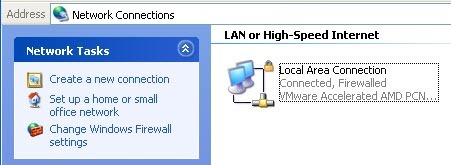
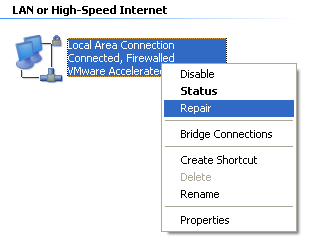
If that does not work, you can also try to Repair the wireless connection. The Repair option tries a few other things, such as disabling and re-enabling the wireless card, clearing out the DNS cache of old records, and then connecting to the wireless network. You can do a repair by going to Network Connections as shown below and right-clicking the wireless connection and choosing Repair. My image is showing Local Area Connection, but you should see Wireless Network Connection if your computer has a wireless card. 
repair network connection
Finally, it’s a good idea to check the TCP/IP properties of your network connection to make sure they are configured properly. A lot of times people manually change them or are told to change them by computer help desk folks on customer support calls. To check the settings, go to Network Connections like mentioned above and then right-click on the network connection and choose Properties.
network connection properties
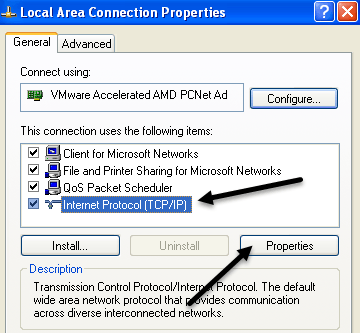
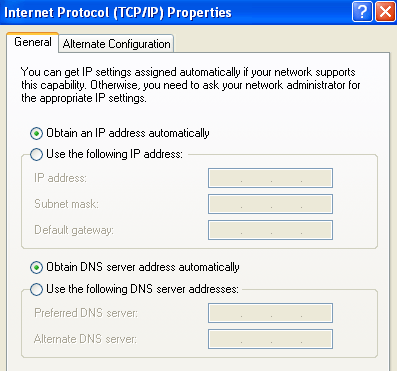
Now select Internet Protocol (TCP/IP) in the list box and click on Properties. You’ll want to make sure that the Obtain an IP address automatically and Obtain DNS server address automatically radio buttons are selected. There are cases where the IP address and DNS server addresses have to be manually entered, but that is rare and should never be the case in the home environment.
obtain ip address automatically
So if updating the driver, resetting the configuration, and repairing the network connection don’t work, then try to unplug the wireless router and plug it back in after about a minute. It’s best to turn off the cable modem too, but you should always turn on the modem first, then the router.
Unless there is something physically wrong with the router, one of the methods above should work! If you’re still have trouble with a network connection in Windows XP, post a comment and we’ll try to help. Enjoy!
Automatically Move Emails into Folders in Outlook using Rules


In this post, we’ll take a look at how you can manage your Outlook email better by having incoming mail automatically moved into separate folders. If you get a lot of email everyday, this can save lots of time. Rather than having to spend an hour once a week moving emails from the Inbox to your categorized folders, email rules will help automate your inbox organization. This is very similar to using labels and filters in Gmail.

Email rules may seem complicated and they can be if you really want to perform some sophisticated sorting, but if you simply want to move work emails to the Work folder automatically, then it’s a piece of cake.
In order for rules to be useful, you should first create some folders underneath your Inbox to categorize your email, such as Projects, Work, Family, etc. You can create folders by right-clicking on Inbox or any folder and selecting New Folder. The following procedure works on Outlook 2010, 2013, and 2016.

Setup Outlook Rules

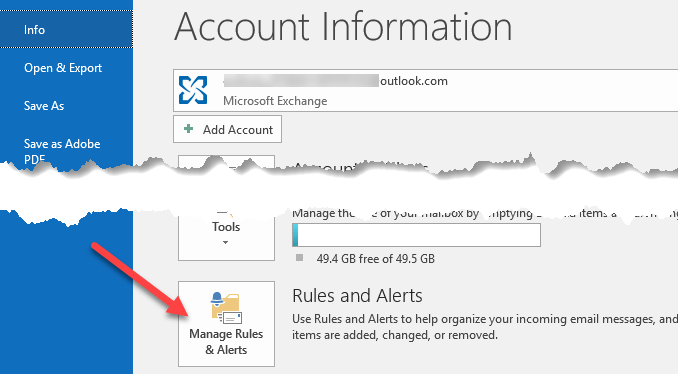
Now to get started, open Outlook, click on the File tab and you’ll see the Manage Rules & Alerts button towards the bottom.
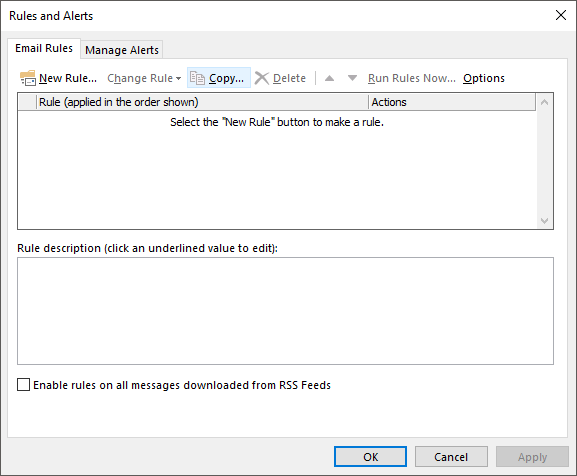
The Rules and Alerts main window will appear and by default you might see one rule already created depending on your version of Outlook.
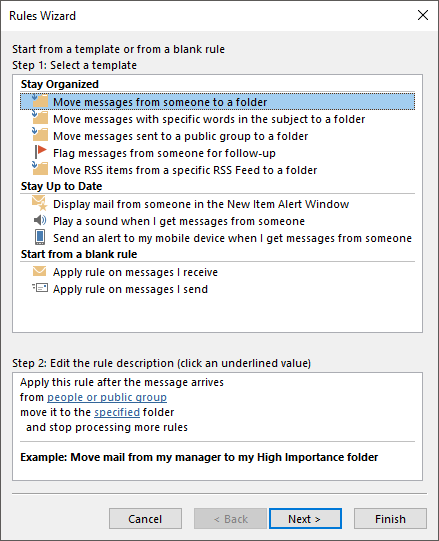
From here you will click the New Rule button to get started with your first Outlook email rule. The Rules Wizard dialog will pop up and it will show you some common rule templates. These are the most common ones and probably all you’ll ever need. The most common rule is the first one listed, “Move messages from someone to a folder“. Go ahead and select it, then click Next.
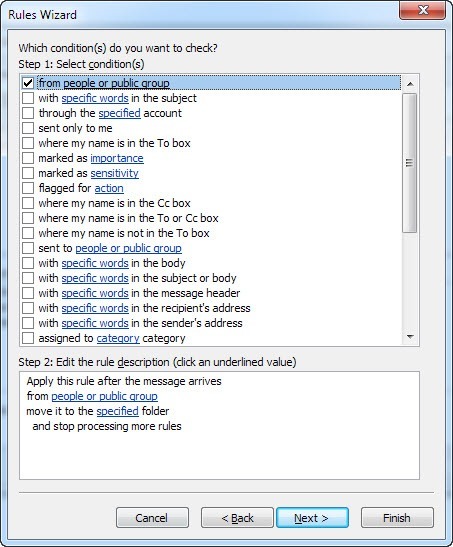
You’ll notice the bottom list box that is called “Step 2:” remains at the bottom with some underlined text. In reality, all of you have to do to setup the rule is click on the hyperlinks for people or public group and specified to choose the email address and where you want those email to go. Then you can click Finish and you’re done. However, if you want to make the rule more complicated, then clicking Next will give you a whole lot more options:
rules wizard
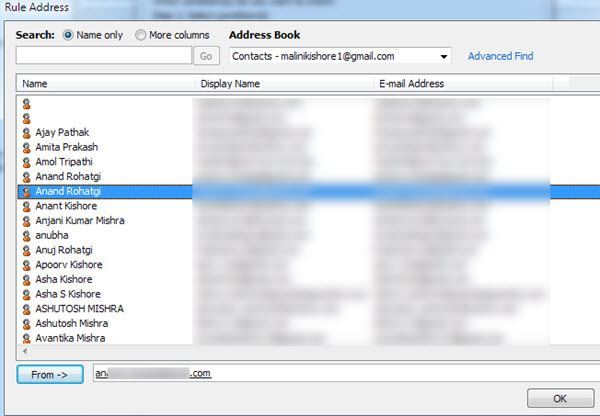
As you check on different conditions in the top list box, the rule description at the bottom will also populate with more hyperlinks. You can even create rules that look for specific words in the email body and then perform actions on those emails. Your next task is to click on each hyperlink and choose the associated values like email addresses, folders, etc. In our example above, you’ll want to click on people or public group and choose an email address.
rules address
Then click on the word specified and browse to the folder you would like the email to be moved to or click New and a new folder will be created under the currently highlighted folder.
rules and alerts folder
Now you’ll see the bottom part updated with the actual values for your rule.
outlook email values
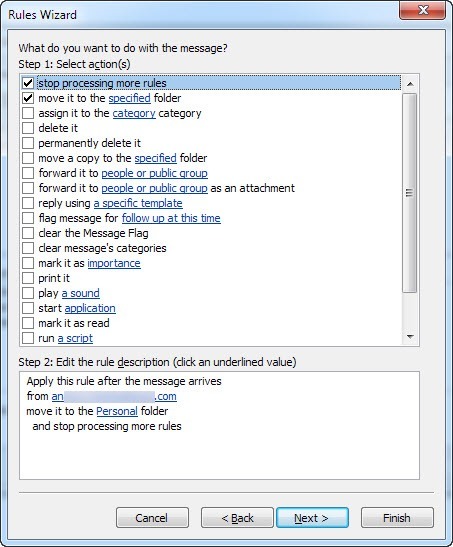
When you click Next, you can set more actions for the rule. You can normally leave this alone if it’s a simple rule, but if you want to also perform other actions like play a sound, forward the email, make a copy of it, print the email, start another program, run a script, etc, then you can do all of that on this screen.
perform actions outlook
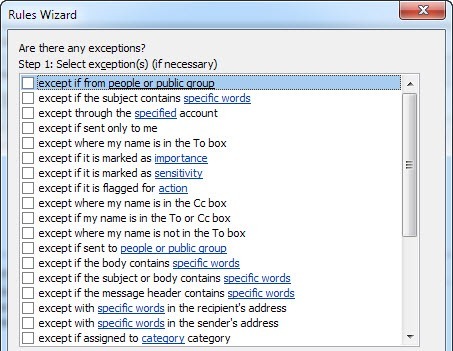
Click Next when you are done and you’ll be brought to the Exceptions dialog, where you can choose what conditions you would not want to have this rule processed. Unless you have some unique cases, you can leave it blank, which is the default.
outlook rules exceptions
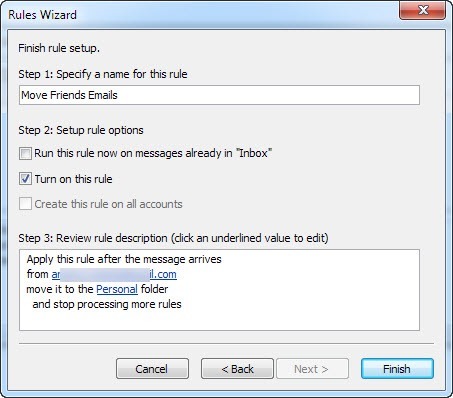
Click Next and we’ve finally reached the end of the rule wizard! Give the rule a name like “Move Friends Email” so that you know what it does when you look at it later on. Then if you have emails already in your Inbox that would match your new rule, check the box to “Run this rule on messages already in Inbox“. You can leave everything else as default and click Finish!
finish outlook rule
Now you can create rules for people, newsletters, bank/credit card statements and whatever else you can think of to start managing your Outlook email more efficiently!
Tuesday, 11 September 2018

7 OS X Tips for Windows Users


If you recently purchased a Mac or if you have been required to use a Mac for work, you might be frustrated trying to use OS X if you have been a long-time Windows user. This is completely understandable and Apple really doesn’t care to change their OS to match that of Windows anytime soon.

Apple loves OS X the way it is and it will probably remain the way it is for the remainder of its life. This means you’ll need to get used to some of the differences between Windows and Mac. In my view, OS X could still be made to be easier to use by default, but unfortunately, you have to manually make some changes to make things better.
In this article, I’m going to give you a couple of my favorite tips for Windows users who have to use a Mac and OS X. Once you get used to OS X, you may even like it more than Windows, which is what happened to me. There is a small learning curve, but it’s worth the effort. Also, be sure to check out my post on programs and features in OS X that are equivalent to Windows.

Tip #1 – How to Right Click

One of the most annoying things as a beginner Mac user is trying to figure out how to right click! There is no separate right-click button for Macs and this can be really annoying for some people. Luckily, the Apple method is actually kind of more intuitive and easier to use.
All you have to do to right-click is to use two fingers when you perform a normal click. When you click with two fingers, you get the right-click context menu. For me, this is way more convenient than having to move my finger all the way down to the correct button like on most Windows laptops.
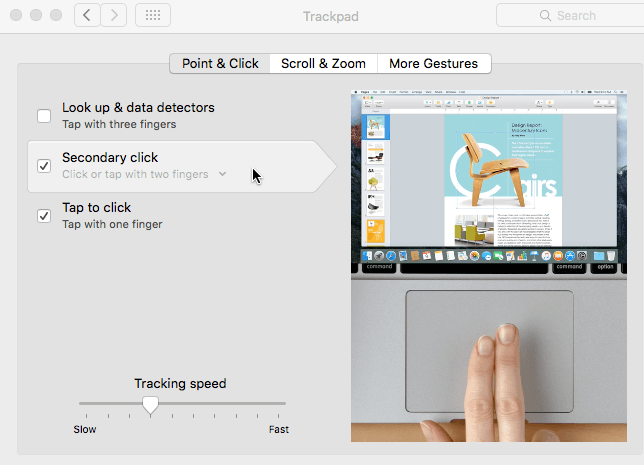
You can change the settings for how right-click works by going to System Preferences – Trackpad and clicking on the Point & Click tab.
By default, the right-click option is called Secondary click in OS X. If checked, it is normally set to Click or tap with two fingers, but you can click on the small little arrow and choose from two other options also: Click in bottom right corner or Click in bottom left corner. If you just love the way you did it in Windows, you can tweak OS X to get the same behavior.
Also, another quick tip is to check the Tap to click option also. Most Windows laptops allow you to tap to click, but OS X does not have this enabled by default so you have to manually press down the button to click. If you go to Scroll & Zoom, you can also change the scroll direction to whichever is more natural for you.

Tip #2 – Add Applications to the Dock

The other major change that is most jarring for Windows users is the lack of a Start button. There simply isn’t any central button in OS X. You have the small Apple logo icon at the top left, which can do a few things like get you to System Preferences or let you restart/shutdown your computer.
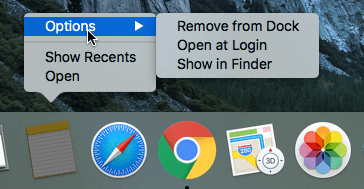
The Dock is basically like the Windows taskbar, but only with shortcuts and nothing else. The other annoying thing is that it starts out completely full of default Apple apps. I almost never use more than one or two, so the first thing I do is get rid of them. You can do this by right-clicking on the icon in the dock, choosing Options and choosing Remove from Dock.
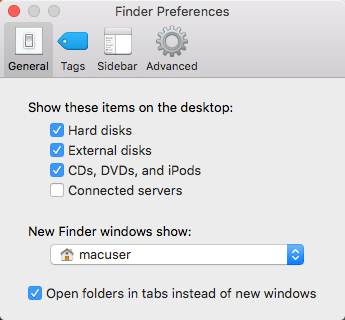
Once you have done that, you can add a kind of All Programs folder to your Dock that will let you see a list of all programs installed in OS X. To do this, you have to drag the Applicationsfolder to your dock. In order to do that, you need to click on the icon of your hard drive that should be on the Desktop. If you don’t see it, click on Finder at the top left of your Mac and then click on Preferences. On the General tab, make sure to check the boxes for Hard disksExternal disks and CDs, DVDs and iPods.
Click on the hard disk icon on your desktop and you should see the Applications folder listed along with other folders like Library, System, Users.
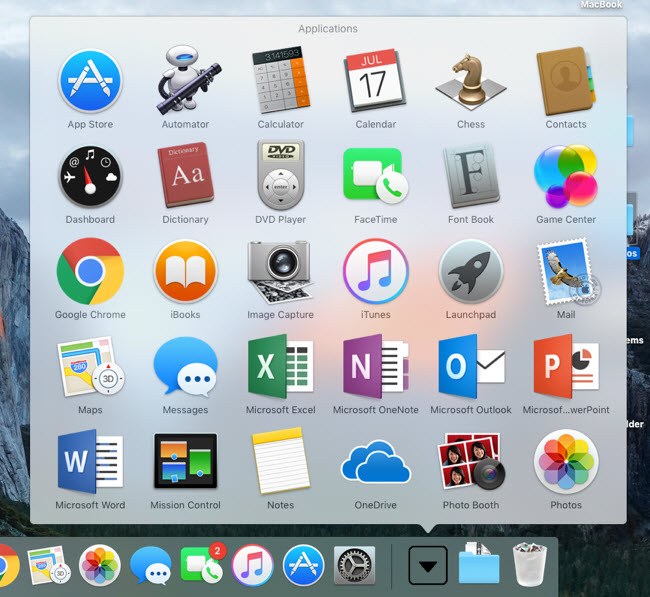
Go ahead and drag that folder down to your Dock. Now when click on the icon, you’ll get a full listing of all the programs installed on your Mac. It’s better than trying to add them all to your Dock or having to use Spotlight to find the program you want to run.
You can also use Launcher (the silver/grey rocket icon in the Dock), but I never find myself using that for some reason.

Tip #3 – Eject Drives using the Trash

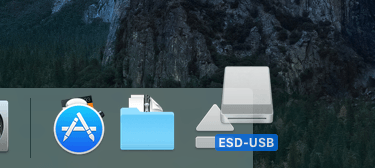
This one has to be the best. For the longest time, Apple has confused people when it comes to ejecting devices from the system. In order to eject a flash drive or DVD, you either have to right-click and choose Eject or you have to drag the item into the Trash.
This would be like dragging your USB drive into the Recycle Bin in Windows, which basically means delete everything! So obviously, people don’t even like the idea of throwing anything that has important data on it into a trash can!
However, that’s how you have to do it in OS X and no, it won’t result in any lost data. You’ll notice, actually, that when you click and drag an external drive or disc in OS X, the icon for the trash can changes to an eject icon. I guess this is supposed to make us feel better somehow.

Tip #4 – Tweak Finder

Finder is basically like Windows Explorer. A much simpler version of Explorer in my view. However, I prefer the more detailed and cluttered view of Explorer than the streamlined Finder. It’s just too simple.
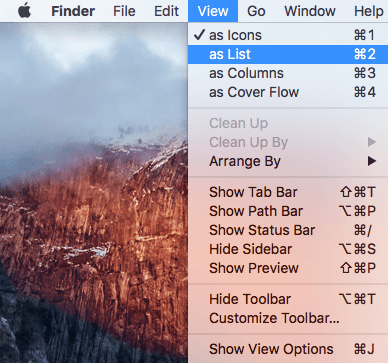
So to add more stuff into Finder, open a Finder window and then click on View and click on the Show Path Bar and Show Status Bar options. This will give Finder a more Explorer-like look.
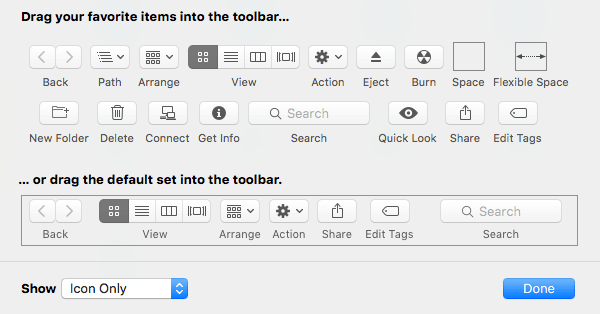
While under View, click on Customize Toolbar to add a couple of useful icons to the default toolbar. Personally, I like to add the New FolderDelete and Get Info buttons to my toolbar.
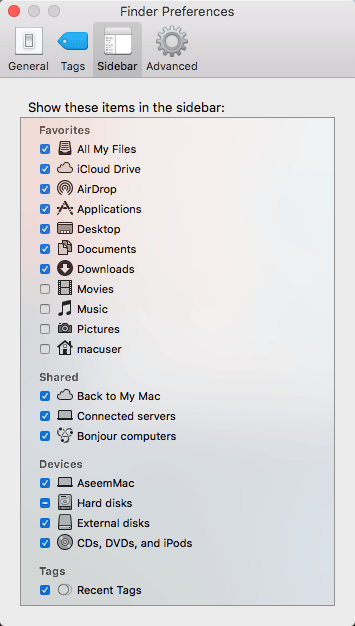
Lastly, click on Finder, then Preferences and then click on Sidebar. Here you can add other items to the Finder sidebar like Pictures, Music, etc. This is similar to the library folders in Windows.
On the General tab, you can also edit the New Finder window shows option and pick something other than All Files. I prefer to pick my home folder, which matches more to Windows explorer.

Tip #5 – Learn to Use Spotlight

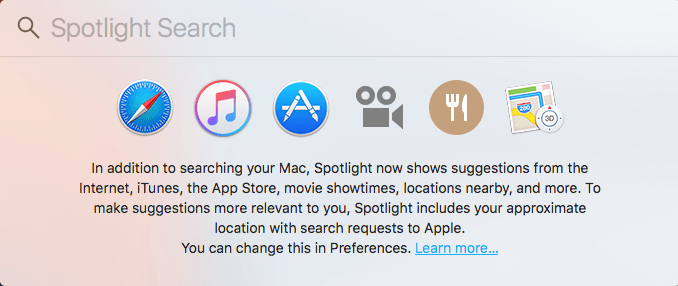
If you’re used to the search box in the Start menu on Windows, you’ll be happy to know there is an equivalent search option in OS X called Spotlight. You can get to it in two ways: either by clicking on the magnifying glass at the top right of your screen or by pressing theCommand + Spacebar keyboard shortcut.
Using Spotlight is the best way to find your files, change settings in OS X, find apps to install, find emails, find calendar events, etc. It also shows results from the web, so you could search for Apple and get suggested websites and even a map to the local Apple store.

Tip #6 – OS X Uses Spaces & Full Screen

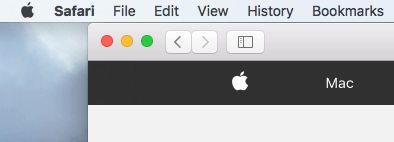
 Another thing you have to get used to is understanding how those three buttons at the top left of every window work. In Windows, you have three buttons: a minimize button, an expand button and a close button. In OS X, you have a red close button, a yellow minimize button and a green button that expands, but differently depending on the program.
If you click on the green button for Safari, for example, it will expand to full-screen and everything else will disappear. If you move your mouse to the top of the screen, you’ll get see the toolbar, but that’s about it. So where did all your other windows go and how do you get to them?
Well, in OS X, the app has basically gone into its own space. If you scroll up with three fingers, you’ll see something called Mission Control. Basically, it shows you a thumbnail of each desktop or program that is using its own space.
They are basically virtual desktops in OS X. Most built-in apps will use up their own space when expanded using the green button. You can either click on a space to activate it or you can use the three finger swipe to the right or left to browse through the spaces. I do like this feature a lot because it lets you work in one app fully, but still allows you to get around to other apps quickly.
On some apps, however, the app will expand to full screen, but it will not go into its own space. It’ll basically remain on the original desktop, just taking up most of the screen. Most third-party apps like Microsoft Office now support the full-screen mode that go into their own space.
You can also click on the little plus icon to add a new desktop if you like. You can have specific programs open in specific desktops if you like and you can even change the background so that each desktop has a different one. It takes a bit of practice, but once you get used to it, you’ll be using it all the time. Just remember the three finger swipes.

Tip #7 – Install Programs from the Mac App Store

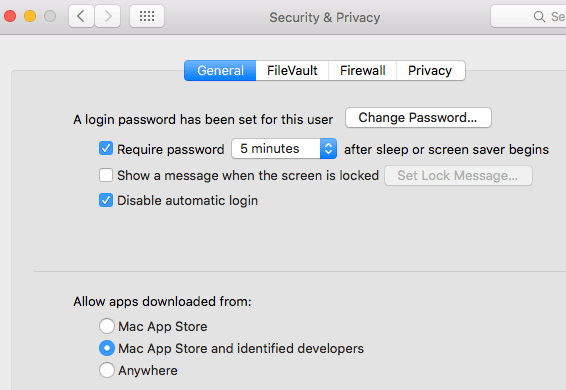
By default, Apple tries to protect you by only allowing you to install apps from the Mac App store and from identified developers. In one sense, it’s good because it keeps you a bit safer without having to do much on your part.
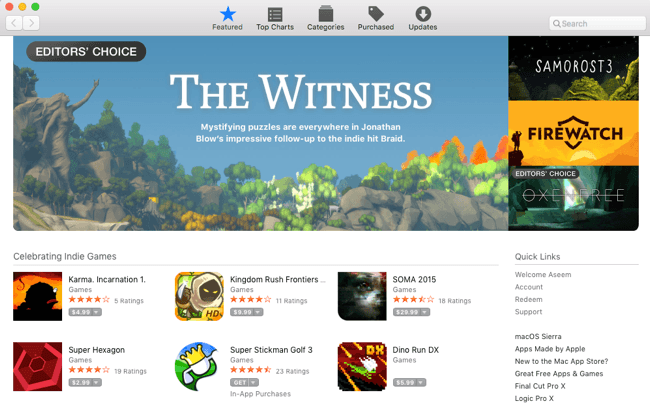
If you want to install a new program, the best place to go is the Mac App store. Whereas Windows software is usually downloaded from everywhere on the Internet, most programs you’ll ever need to install on your Mac will be available in the Mac App store. If you really need to install something from some other place, you can go to System Preferences – Security & Privacy and select Anywhere under Allow apps downloaded from.
So hopefully those are some good tips for beginner Mac users who pretty much used Windows for their entire lives. There are a lot of other differences, but if you can get through these major ones, you’ll enjoy using your Mac rather than wanting to beat it. Enjoy!